The wifi setup could have been simpler, but eh. It’s done and it works. I’m using pfsense as my main router and 2 (eventually 4) Unifi UAP-AC-Pro’s as my access points. I’m running the Unifi controller in a container on my colocated server in Chicago for accessibility purposes. It’s considered “home prod”.
In my previous post I described the network layout. Initially, I planned to have separate wifi networks for each of my tenants, plus a network for IoT/HA/cameras, plus a guest network, plus a “shared” house network for Chromecasts, et al. Turns out, though, you can only have 4 ssid’s per band per AP. Which is severely limiting, to say the least, if you want to double up 2.4 and 5.8 for each network.
So my options now are:
1. Scrap multiple networks, take the easy way out, and have everyone’s mobile devices/laptops/tablets on the same shared network, or
2. Set up RADIUS vlan assignment.
I went with option 2.
I already have the vlans set up on pfsense, I’ve got my cheapo TPLink TL-SG108E 8-port smart switch set up with my vlans, and I’ve got all my planned wifi-accessible networks tagged on the access point ports. I immediately lost connection to the AP’s when I made that change. Fuck.
So, I forgot that when you set up vlans, you need to set up a default tag to tag untagged frames with. Initially I had that set up as the “wife and I” network. I changed the default on those ports to the management/untagged network, vlan 1. The AP’s dropped, couldn’t get dhcp reassigned, and I had to manually reset them. Then I plugged them back into the management vlan ports and watched the dhcp leases. Success! They were assigned a 10.0.255.x ip, which meant they were on the management vlan. SSH in using the default creds, manually do set-inform, and they appear on the controller. Bam, wifi’d.
Next up, vlan troubleshooting on the switch. The interface is less than intuitive but the documentation isn’t bad. In the end I landed on this:
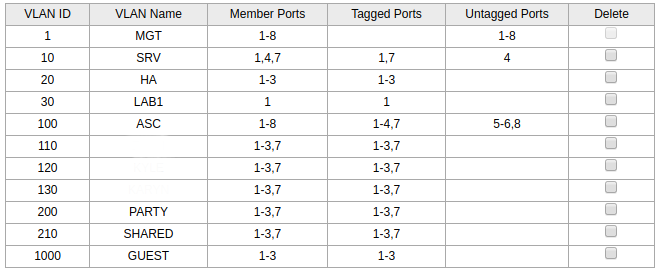
I’ve got the AP’s on ports 2 and 3 and the pfsense router on port 1, which is my trunk port. After some tweaking I finally got the vlans to work on ports 2 and 3. I really wish the PVID/default tag settings were on the same page in the interface.
I set up a docker image on my PC with RADIUS, a couple local config file mounts, and a port. Unifi wasn’t having it and I’m far too lazy to do a full implementation of RADIUS for my lab. So I did some googling and found out that you can just install RADIUS on pfsense. Score.
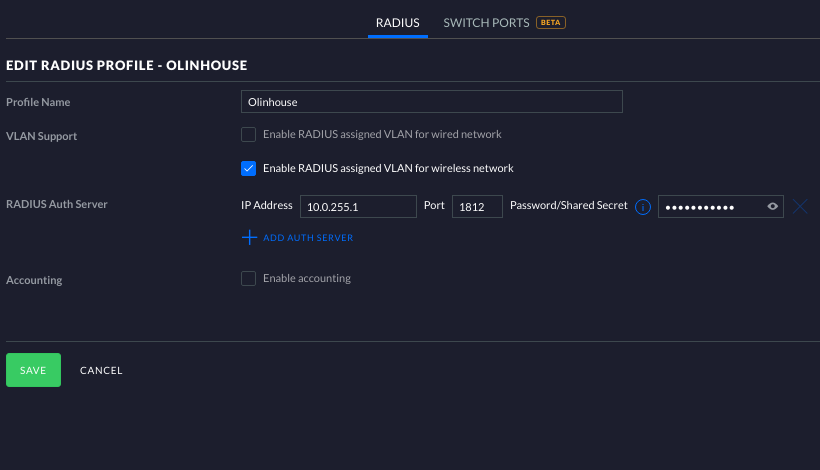
So I set up a profile in the Unifi controller. Not bad, just use the management network IP of the pfsense router as your auth server, port 1812, and tick “Enable RADIUS assigned VLAN for wireless network.”
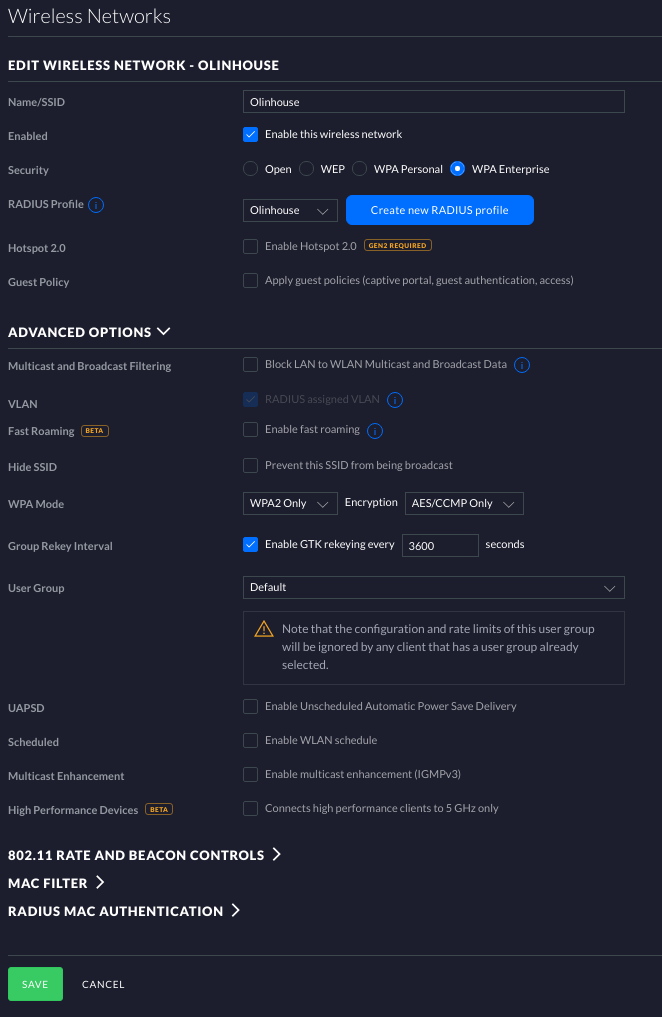
Now we need to set up the wireless network to take advantage of the RADIUS profile we just made. Click on Wireless Networks. Name your SSID, select “WPA Enterprise under security, and then select your RADIUS profile you just made. Under Advanced Options, make sure that RADIUS assigned VLAN is checked.
After that, I went over to pfsense and picked up the FreeRADIUS plugin. Easy enough, just downloads, installs and oh damn that’s a lot of tabs. Alright, RADIUS is pretty involved. But fortunately I’m only interested in a few parts of it.
For users, you just set up a username, password, and the vlan of the network you’d like them to use. That’s the least involved part of this process.
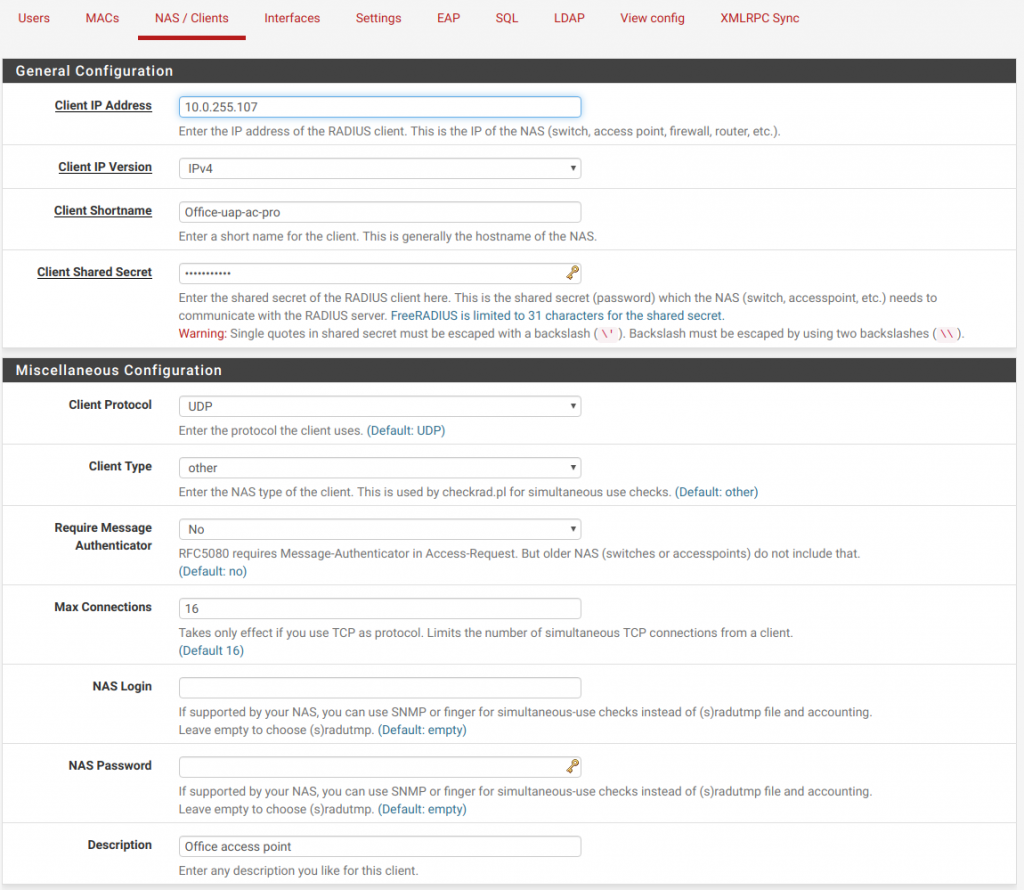
Next up, head over to NAS/Clients. You’ll need to grab the ip’s of your Unifi access points, because you can’t set up whole-ip-range permissions. You have to do it for each one, and honestly that’s probably for the best anyway. You can also take this opportunity to set static ip mappings for the AP’s. I didn’t because I’m moving this whole network in a month anyway.
You’ll have to set up an interface for both auth and accounting. I don’t use accounting really, but it might be a nice feature down the line. Set port 1812 for auth and 1813 for acct.

You don’t need to touch anything under “Settings” for this setup.
Under EAP, set the following:
- Under EAP-TTLS, set Use Tunneled Reply to Yes
- Under EAP-PEAP, set Use Tunneled Reply to Yes
- Under EAP-PEAP, set Default EAP Type to MSCHAPv2
At this point, you should be able to log in using one of the users you made. It’s pretty straightforward to connect a phone to the network. Just make sure you use PEAP, pick MSCHAPv2 for Phase 2, and don’t validate the CA.
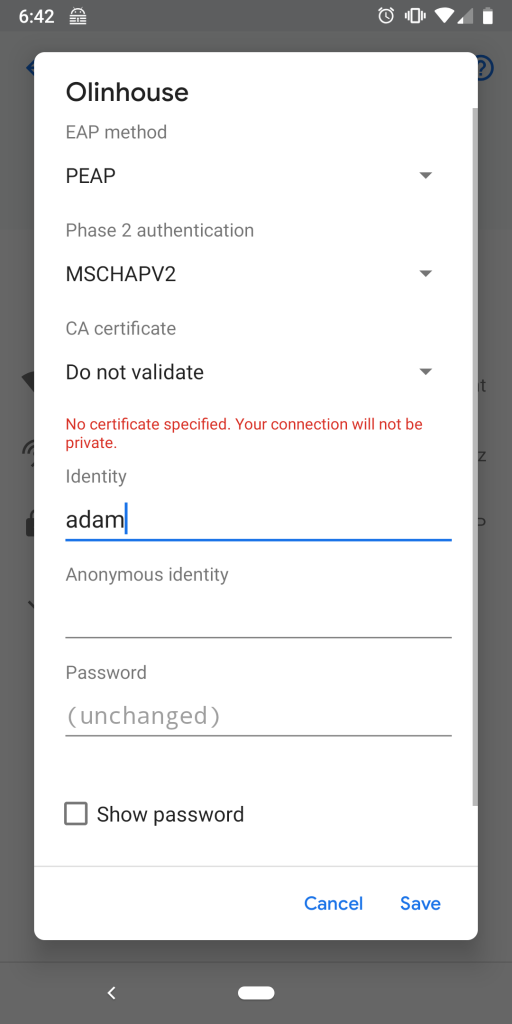
And just like that, you’re in. EZPZ.